Machine Learning Integration
Many ML and data science workflows are Python-first, while mature logic synthesis data structures and algorithms are
predominantly implemented in C/C++ toolchains. Without reusable infrastructure, projects often reimplement synthesis
functionality in Python or rely on brittle wrappers and file-conversion scripts around external tools. aigverse
addresses this gap by exposing native AIG construction, manipulation, optimization, and analysis through an idiomatic
Python API, and by providing optional adapters for graph and numeric representations. This enables reproducible dataset
generation, feature extraction, and downstream model experimentation from within standard Python workflows.
Adapters
Adapters are the interoperability layer for ML and data science workflows. To keep the base library lightweight, they
are optional and installed via the adapters extra only when needed. See the
Installation documentation for more details.
Dataset Generation
The generators module offers a reproducible way to create synthetic AIG datasets before converting them into ML-ready formats.
 1import random
 2
 3from aigverse.generators import random_aig
 4
 5rng = random.Random(1234)
 6
 7# Generate a reproducible, size-diverse AIG dataset
 8dataset = [
 9    random_aig(
10        num_pis=rng.randint(4, 6),
11        num_gates=rng.randint(20, 40),
12        seed=5000 + i,
13    )
14    for i in range(16)
15]
16
17print(len(dataset), dataset[0].num_pis, dataset[0].num_gates)
16 5 23
NetworkX
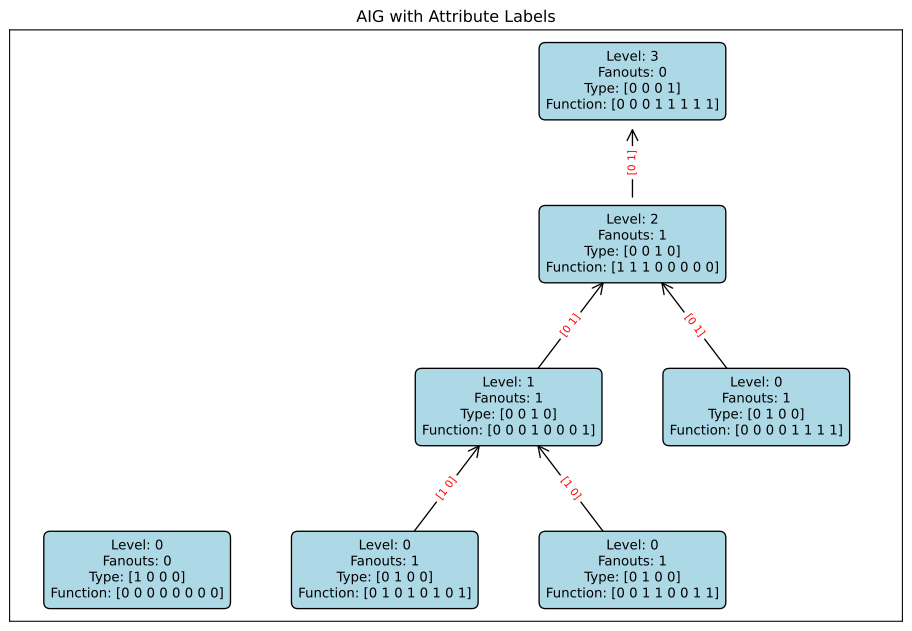
The NetworkX adapter allows you to convert an AIG into a DiGraph object.
This enables use of graph-analysis and graph-learning tooling that operates on NetworkX graphs. Once converted, you can
extract node and edge features, visualize the structure (e.g., with Matplotlib), or feed
the graph into downstream model pipelines.
 1import matplotlib.pyplot as plt
 2import networkx as nx
 3from networkx.drawing.nx_agraph import graphviz_layout
 4import numpy as np
 5
 6from aigverse.networks import Aig
 7import aigverse.adapters
 8
 9# Create a sample AIG
10aig = Aig()
11a = aig.create_pi()
12b = aig.create_pi()
13c = aig.create_pi()
14f1 = aig.create_and(a, b)
15f2 = aig.create_or(f1, c)
16aig.create_po(f2)
17
18# Convert the AIG to a NetworkX graph
19G = aig.to_networkx(levels=True, fanouts=True, node_tts=True, dtype=np.int32)
20
21# Generate the initial layout using Graphviz's 'dot' program
22pos = graphviz_layout(G, prog="dot")
23
24# Invert the y-axis to flip the layout upside down
25# This places the primary inputs (level 0) at the bottom
26for node, position in pos.items():
27    pos[node] = (position[0], -position[1])
28
29# Prepare the labels for nodes and edges from graph attributes
30node_labels = {
31    node: f"Level: {data['level']}\nFanouts: {data['fanouts']}\nType: {data['type']}\nFunction: {data['function']}"
32    for node, data in G.nodes(data=True)
33}
34edge_labels = {(u, v): data["type"] for u, v, data in G.edges(data=True)}
35
36# Plot the graph
37plt.figure(figsize=(12, 8))
38plt.title("AIG with Attribute Labels")
39
40# Draw the graph structure (just the edges and arrows)
41nx.draw_networkx_nodes(G, pos, node_size=0)
42
43# Draw the node labels with a bounding box
44nx.draw_networkx_labels(
45    G,
46    pos,
47    labels=node_labels,
48    font_size=10,
49    bbox={"facecolor": "lightblue", "edgecolor": "black", "boxstyle": "round,pad=0.5"},
50)
51
52# Draw the network edges
53nx.draw_networkx_edges(
54    G,
55    pos,
56    node_size=5000,
57    arrows=True,
58    arrowstyle="->",
59    arrowsize=20,
60)
61
62# Draw the edge labels to show edge attributes
63nx.draw_networkx_edge_labels(G, pos, edge_labels=edge_labels, font_color="red", font_size=8)
64
65# Pad and show the plot
66plt.margins(x=0.2)
67plt.show()
DLPack Tensors
For high-throughput ML pipelines, aigverse can export AIG objects directly as graph tensors (node
attributes, edge indices, and edge attributes) utilizing the DLPack protocol via the to_graph_tensors() method. This allows
zero-copy hand-off to modern tensor frameworks, such
as PyTorch,
JAX,
TensorFlow, etc., through
from_dlpack.
Note
PyTorch publishes no win_arm64 wheels, so the torch snippets below cannot run on Windows on ARM. The DLPack export
itself is unaffected — consume it with NumPy
instead, as shown at the end of this section.
Encoding and dtype mapping:
Edge encoding (
edge_attr):EdgeTensorEncoding.BINARY: regular0.0, inverted1.0EdgeTensorEncoding.SIGNED: regular+1.0, inverted-1.0EdgeTensorEncoding.ONE_HOT: regular[1.0, 0.0], inverted[0.0, 1.0]
Node encoding (
node_attr):NodeTensorEncoding.INTEGER:constant=0,pi=1,gate=2,po=3NodeTensorEncoding.ONE_HOT:[constant, pi, gate, po]
Tensor
dtypes:edge_index:int64edge_attr:float32node_attr:float32
Tensor shapes follow the convention:
where \(E\) is the number of edges and \(N\) is the number of nodes. For edge features,
\(D_{\text{edge}} = 1\) for BINARY and SIGNED, and \(D_{\text{edge}} = 2\) for ONE_HOT.
The node feature width \(D_{\text{node}}\) depends on the chosen node encoding and enabled optional features.
Note
Current limitations of to_graph_tensors:
The export targets combinational networks. Sequential networks are not supported.
Exported tensors are backed by CPU host memory (NumPy-backed DLPack producer).
torch.from_dlpack(...)is zero-copy on CPU, but moving tensors to CUDA still allocates GPU memory and performs a host-to-device copy.When
node_tts=True, the export is restricted to at most 16 primary inputs due to the exponential growth of truth table size. This is a practical limit for ML applications, but it is not a fundamental limitation of the API.
 1import torch
 2
 3from aigverse.networks import Aig, EdgeTensorEncoding, NodeTensorEncoding
 4
 5aig = Aig()
 6a = aig.create_pi()
 7b = aig.create_pi()
 8g = aig.create_and(a, b)
 9aig.create_po(g)
10
11dlpack_data = aig.to_graph_tensors(
12    node_encoding=NodeTensorEncoding.INTEGER,
13    edge_encoding=EdgeTensorEncoding.BINARY,
14    levels=True,
15    fanouts=True,
16    node_tts=False,
17)
18
19edge_index = torch.from_dlpack(dlpack_data["edge_index"])
20edge_attr = torch.from_dlpack(dlpack_data["edge_attr"])
21node_attr = torch.from_dlpack(dlpack_data["node_attr"])
22
23print(edge_index.shape, edge_attr.shape, node_attr.shape)
torch.Size([2, 3]) torch.Size([3, 1]) torch.Size([5, 3])
You can immediately construct sparse tensors in Python:
 1num_nodes = node_attr.shape[0]
 2
 3sparse_adj = torch.sparse_coo_tensor(
 4    indices=edge_index,
 5    values=edge_attr,
 6    size=(num_nodes, num_nodes, edge_attr.shape[1]),
 7    is_coalesced=True,
 8    check_invariants=False,
 9)
10
11print(sparse_adj.shape)
torch.Size([5, 5, 1])
The same export also works with NumPy’s DLPack consumer API:
1import numpy as np
2
3edge_index_np = np.from_dlpack(aig.to_graph_tensors()["edge_index"])
4print(edge_index_np.shape)
(2, 3)
Truth Tables
Truth tables are iterable, but for ML pipelines it is best to keep data in contiguous array/tensor form from the start. A practical pattern is:
Materialize labels once as a NumPy array.
Build the input matrix with vectorized NumPy operations.
Convert to framework tensors (for example, PyTorch) without copying.
This keeps preprocessing fast and avoids Python-level loops in hot paths.
 1import numpy as np
 2import torch
 3
 4from aigverse.utils import TruthTable
 5
 6# Create a simple truth table (3-input majority function)
 7tt = TruthTable(3)
 8tt.create_from_hex_string("e8")
 9
10# Vectorized label extraction (shape: [2**num_vars])
11y_np = np.fromiter(tt, dtype=np.uint8)
12
13# Vectorized feature matrix generation (shape: [2**num_vars, num_vars])
14n = tt.num_vars()
15indices = np.array(range(2**n), dtype=np.uint32)[:, None]
16bit_positions = np.array(range(n - 1, -1, -1), dtype=np.uint32)
17X_np = ((indices >> bit_positions) & 1).astype(np.uint8)
18
19# Zero-copy bridge NumPy -> PyTorch
20X_torch = torch.from_numpy(X_np)
21y_torch = torch.from_numpy(y_np)
22
23print("NumPy shapes:", X_np.shape, y_np.shape)
24print("Torch shapes:", X_torch.shape, y_torch.shape)
NumPy shapes: (8, 3) (8,)
Torch shapes: torch.Size([8, 3]) torch.Size([8])